Caja-Actions Configuration Tool User's Manual
1. Introduction
Caja-Actions™ is a Caja™ extension whose principal function is to allow the user to add arbitrary actions to the file manager context menus. These actions may be organized in menus and submenus, exported and shared with other desktop environments.
The Caja-Actions Configuration Tool application is the user interface which lets you precisely configure how, where and when your actions should appear in Caja™ context menus, and how they will be executed.
Caja-Actions Configuration Tool provides the following features:
- Define and configure actions from scratch.
- Organize actions into menus, submenus and so on.
- Import and export actions and menus from and to outside world.
Caja-Actions™ also comes with additional features such as:
-
A Caja™ plugin which exports in real time to D-Bus the currently selected files.
-
A command-line program which is able to run any action.
Associated with the D-Bus interface, this program lets the user run any action from a keyboard shortcut, applying this action to the item(s) currently selected in the file manager.
-
A command-line program which is able to create a new action.
All these features are more thoroughly described in the global Caja-Actions™ documentation.
2. Getting Started
2.1. Starting Caja-Actions Configuration Tool
You can start Caja-Actions Configuration Tool in the following ways:
- menu
-
Choose .
- Command line
-
To start Caja-Actions Configuration Tool from a command line, type the following command:
caja-actions-config-tool
then press Return.
To view available command line options, type:
caja-actions-config-tool --help-all
then press Return.
2.2. The first run
When you start Caja-Actions Configuration Tool, the following window is displayed.
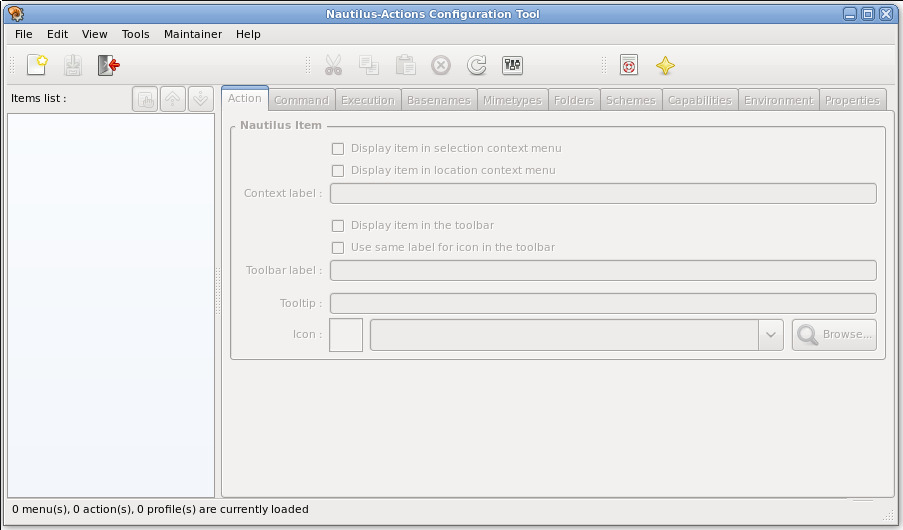
The empty Caja-Actions Configuration Tool main window
The Caja-Actions Configuration Tool main window contains the following elements:
- Menubar.
-
The menus on the menubar contain all of the commands you need to use in Caja-Actions Configuration Tool.
Shortcuts are available for some commands:
- Ctrl+N
-
Create a new action.
- Ctrl+S
-
Save modified actions and menus.
- Ctrl+Q
-
Quit the application.
- Ctrl+X
-
Cut the current selection, keeping it in the clipboard.
- Ctrl+C
-
Copy the current selection to the clipboard.
- Ctrl+V
-
Insert the content of the clipboard before the current item.
- Shift+Ctrl+V
-
Insert the content of the clipboard as subitem(s) of the current item.
- Delete
-
Delete the current selection.
- F5
-
Reload the actions and menus.
- F1
-
Display the help.
- Toolbar.
-
Several toolbars may be displayed below the menubar, depending of your choices in the submenu.
- Items list.
-
The list on the left of the main window contains all items, whether they are actions or menus, currently available for edition in Caja-Actions Configuration Tool.
Items may be sorted in ascending or descending alphabetical order, or not sorted at all, being directly organized and managed by the user.
Invalid items are displayed in red color.
Modified items are displayed in italic characters.
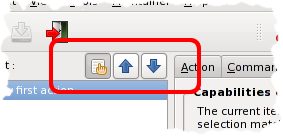
- Sort buttons
-
Three buttons allow you to toggle between sort modes.
- Properties tabs.
-
The right part of the main window displays all is needed to define how, when and where actions and menus should be displayed.
- Action/Menu
-
Define in which Caja™ menus the item should appear, and how it will be displayed.
- Command
-
Specify which command to execute, and which parameters pass to it.
- Execution
-
Specify how the command should be executed.
- Basenames
-
Define the basename filters the Caja™ selection must satisfy in order the action or menu be candidate for display.
- Mimetypes
-
Define the mimetype filters the Caja™ selection must satisfy in order the action or menu be candidate for display.
- Folders
-
Define the folder filters the Caja™ selection must satisfy in order the action or menu be candidate for display.
- Schemes
-
Define the scheme filters the Caja™ selection must satisfy in order the action or menu be candidate for display.
- Capabilities
-
Define the capability filters the Caja™ selection must satisfy in order the action or menu be candidate for display.
- Environment
-
Define some environment conditions the Caja™ selection must satisfy in order the action or menu be candidate for display.
- Properties
-
Display item properties.
- Statusbar.
-
The statusbar displays some status informations about the currently selected row in the items list.
When no relevant information is to be displayed, the statusbar displays the count of loaded menus, actions and profiles.
The « read-only » icon
 is displayed in
the right of the statusbar when appropriate.
2.3. Creating your first action
In this example, we are going to create an action which displays some pretty informations about the current selection.
This action will require MateDialog™.
MateDialog™ is a program which will allow you to create a graphical user interface from a command-line.
You should check that this program is installed on your system, by example by typing the following command in a terminal:
matedialog
then press Return.
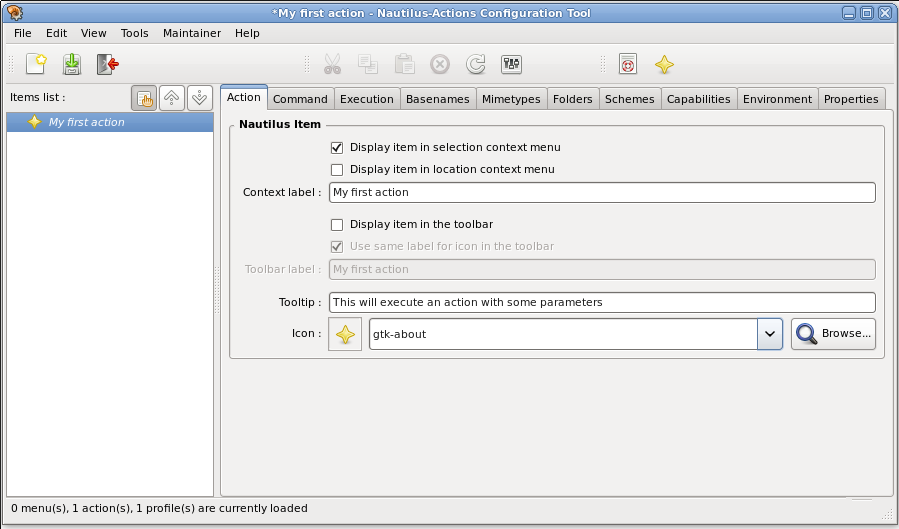
To create a new action, choose .
A new action is inserted in the items list, and its properties are displayed in the tabs on the right pane.
The label of the currently edited action (this one) is added to the application name in the title bar.
In the Items list, the new action is displayed in italic characters.
Italics are used as a reminder that the item has not yet been saved.
As another reminder that there is some pending modifications, an asterisk (« * ») comes to prefix the application name in the title bar.
It merely consists of choosing how your action will be displayed in the file manager context menu.
-
Enter My first action in the Context label entry box.
The Context label entry box contains the label of the action as you want it to be displayed in the file manager context menu.
The label is a mandatory property of your action. If it happens to be empty, then your action will be considered as invalid by Caja-Actions™: it will be displayed in red in Items list and will never be candidate to be displayed in the file manager context menus.
-
Enter This will execute an action with some parameters in the Tooltip entry box.
The Tooltip entry box contains the text you want to be displayed as a short help to your action.
-
Select
 in the Icon drop-down list.
The Icon selection defines the icon which will be associated with your action in file manager context menus and in the toolbar.
You have two ways of choosing the icon associated to your action:
- Click on the Icon drop-down list to select an icon.
- Click on to search for an image in the filesystem.
When you will select your action in the file manager context menu, this command will be executed, with arguments of your choice.
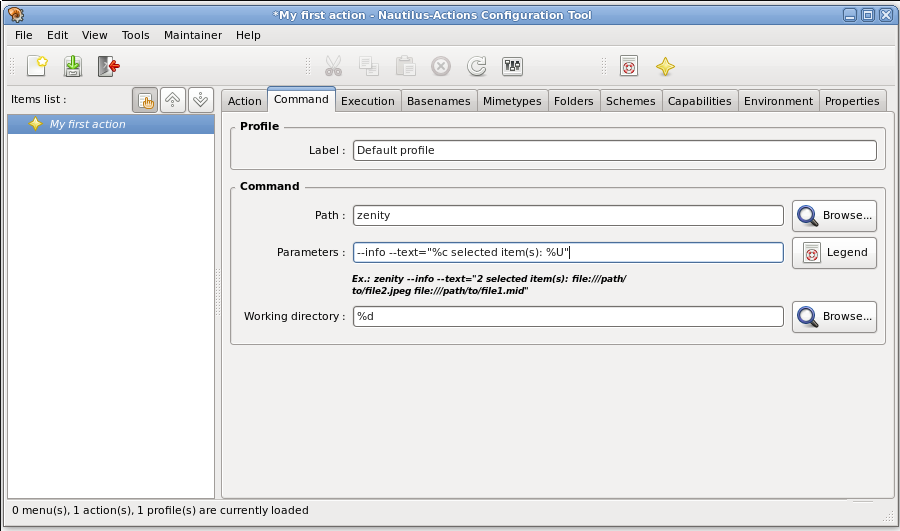
Click on the Command tab to show the page which will permit you to enter the command.
-
Enter matedialog in the Path entry box.
The Path entry box defines the command which will be executed when you will select your action in the file manager context menu.
You have two ways of defining the command to be executed:
- Enter it in the Path entry box.
- Click on to select the executable file on the filesystem.
If the command you enter does not have an absolute path, then it will be searched for in the PATH variable at execution time.
-
Enter --info --text='%c selected item(s): %U' in the Parameters entry box.
The Parameters contains the arguments which will be passed to your command when it will be executed. These arguments may embed parameters which will be expanded at runtime.
If both Path and Parameters are empty, then this action will be considered as invalid: it will be displayed in red in Items list and will be never be candidate to be displayed in the file manager context menus.
To save all pending modifications, choose .
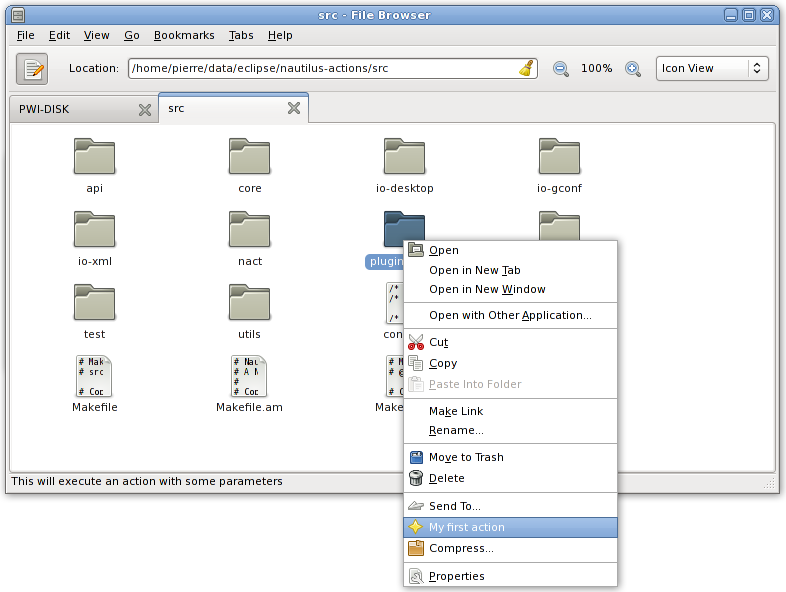
Caja™ automatically takes into account your new action, and displays it in its context menu.
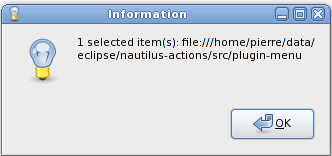
Cliking of the item in the Caja™ context menu activates it, and executes the corresponding command.
3. Using Caja-Actions Configuration Tool
- 3.1. Defining the conditions
- 3.2. Locating the action
- 3.3. What action should be executed ?
- 3.4. Using profiles to extend your action
- 3.5. Organizing actions in menus
- 3.6. Sorting the items list
- 3.7. Editing
- 3.8. Saving your modifications
- 3.9. Exporting your actions
- 3.10. Importing actions
- 3.11. Setting your own preferences
3.1. Defining the conditions
Whether your action will eventually be displayed in Caja™ file manager context menus or in its toolbar depends on the conditions you will have defined for it.
Conditions may be put against the location the file manager currently points to, or against the currently selected items in this location.
Each time the selection or the location change in the file manager, Caja-Actions™ checks all your actions, comparing the defined conditions against the new location and selection: all defined conditions must be satisfied in order your action be actually displayed.
- 3.1.1. Basename-based conditions
- 3.1.2. Mimetype-based conditions
- 3.1.3. Folder-based conditions
- 3.1.4. Scheme-base-conditions
- 3.1.5. Capability-based conditions
- 3.1.6. Selection count condition
- 3.1.7. Desktop selection
- 3.1.8. Executable found condition
- 3.1.9. D-Bus registration condition
- 3.1.10. Customized condition
- 3.1.11. Running process condition
3.1.1. Basename-based conditions
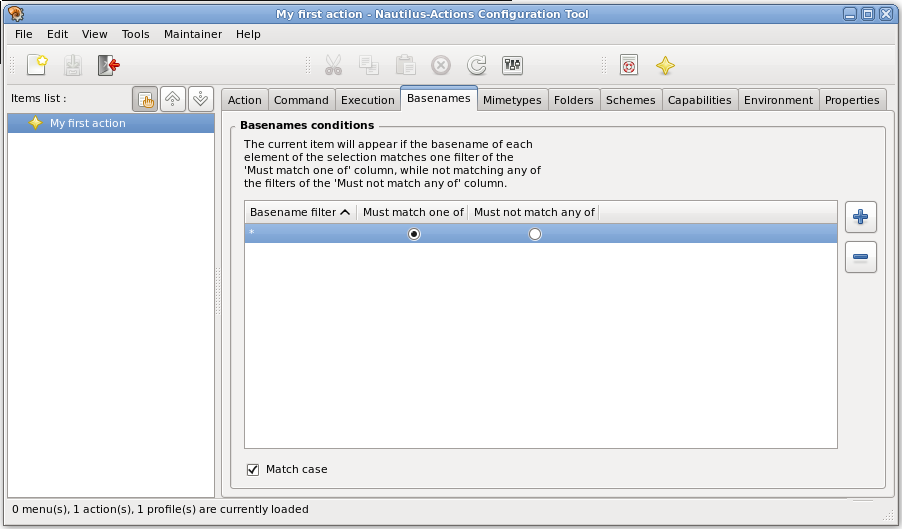
You may decide that your action will appear depending on the basenames of the items currently selected in the file-manager: you may define that each item of the selection must meet some sort of basename, and you may simultaneously decide that none of the selected item(s) can have some other sort of basename.
Click on the Basenames tab to show the page which will permit you to configure your basename-based conditions.
In fact, basename-based conditions are built as a list of « must match one of » and « must not match any of » patterns. In order for your action to be a candidate regarding these basename-based conditions, each element of the selection must be valid for all the listed conditions: the basename of each element must match at least one of the defined « must match one of » patterns, and must not match any of the defined « must not match any of » patterns.
If at least one element of the selection does not match all the defined conditions, then your action will not be displayed.
When targeting the selection context menu, your basename-based conditions will be checked against the currently selected items. When targeting the location context menu or the toolbar, your basename-based conditions will be checked against the basename of the current location.
Defining a new basename-based condition involves two steps.
-
Define the new condition filter.
-
Press Insert or click on button to insert a new condition filter
-
Edit the newly inserted condition filter to the basename you want match.
A basename-based condition may use « * » or « ? » wildcard characters.
-
-
Indicates whether this a « must match one of » or a « must not match any of » condition.
Click on the Must match one of or Must not match any of radio button in the same row to set the corresponding condition.
Depending of your target operating system, make sure that the Match case checkbox is activated (or not).
-
When activated, all filters are considered as case sensitive, which means that /my/file filename is considered distinct from /My/File one.
This is the default behavior on Unix-like systems.
-
When deactivated, filters are considered as case insensitive, which means that /my/file and /My/File filenames are considered the same name.
This is most probably what you want if you target some sort of Windows™ system.
Removing a defined basename-based condition is as simple as selecting it, and pressing Del (or clicking on button).
By default, the basename-based condition is just one « must match one of * » condition. As all basenames always match the « * » condition, this just means that basename-based conditions are not considered as relevant for the action.
3.1.2. Mimetype-based conditions
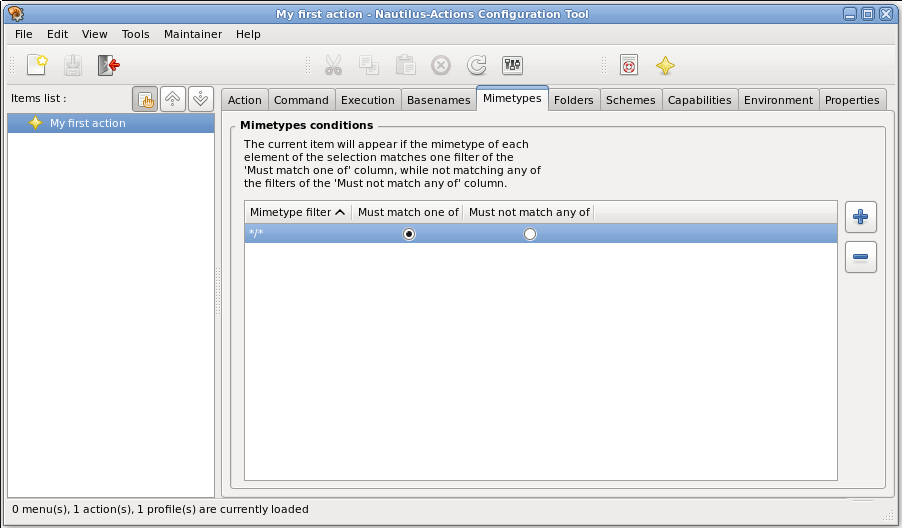
You may decide that your action will appear depending on the mimetypes of the items currently selected in the file-manager: you may define that each item of the selection must meet some sort of mimetype; and you may simultaneously decide that none of the selected item(s) can have some other sort of mimetype.
Click on the Mimetypes tab to show the page which will permit you to configure your mimetype-based conditions.
In fact, mimetype-based conditions are built as a list of « must match one of » and « must not match any of » patterns. In order for your action to be a candidate regarding these mimetype-based conditions, each element of the selection must be valid for all the listed conditions: the mimetype of each element must match at least one of the defined « must match one of » patterns, and must not match any of the defined « must not match any of » patterns.
If at least one element of the selection does not match all the defined conditions, then your action will not be displayed.
When targeting the selection context menu, your mimetype-based conditions will be checked against the currently selected items. When targeting the location context menu or the toolbar, your mimetype-based conditions will be checked against the mimetype of the current location, which happens to be the well known « inode/directory » mimetype.
Defining a new mimetype-based condition involves two steps.
-
Define the new condition filter.
-
Press Insert or click on button to insert a new condition filter
-
Edit the newly inserted condition filter to the mimetype you want match.
A mimetype must be defined as a group/subgroup expression.
The « * » wildcard is supported only in some situations:
- The « */* » expression matches all mimetypes. As a convenient shortcut, the « * » literal is also accepted for this same purpose.
- A group/* string matches all subgroups of group mimetype.
- The */subgroup string is not accepted as a valid wildcard.
-
-
Indicates whether this a « must match one of » or a « must not match any of » condition.
Click on the Must match one of or Must not match any of radio button in the same row to set the corresponding condition.
Removing a defined mimetype-based condition is as simple as selecting it, and pressing Del (or clicking on button).
By default, the mimetype-based condition is just one « must match one of */* » condition. As all mimetypes always match the « */* », this just means that mimetypes are not considered as relevant for the action.
- all/all
-
Matches all items.
- all/allfiles
-
Matches all regular files.
- inode/directory
-
Matches only directories.
3.1.3. Folder-based conditions
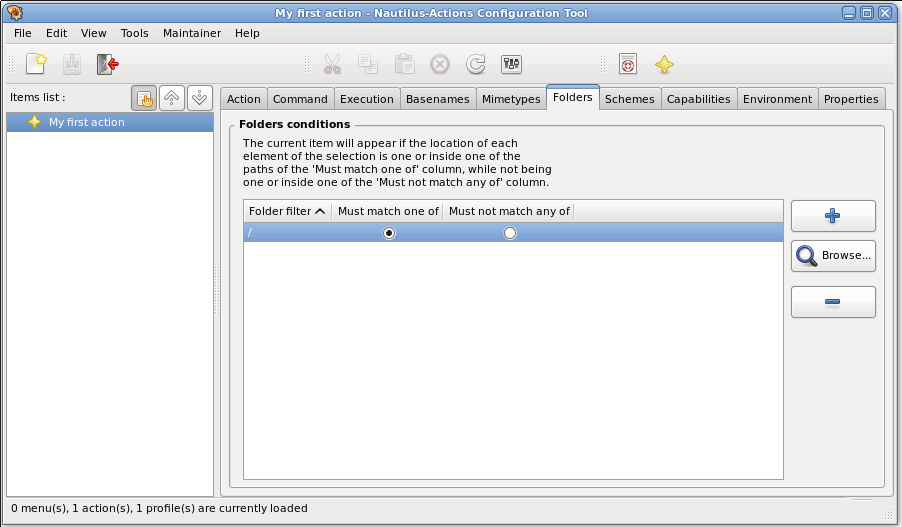
You may decide that your action will appear depending on the directory the items currently selected in the file-manager are located in: you may define that each item of the selection must be located in one hierarchy or in another; and you may simultaneously decide that none of the selected item(s) can be located in some other hierarchy.
A folder-based condition must be understood as the specification of the hierarchy in which the currently examined item should (or should not) stay: this is a pattern on the dirname of the element.
Click on the Folders tab to show the page which will permit you to configure your folder-based conditions.
In fact, folder-based conditions are built as a list of « must match one of » and « must not match any of » patterns. In order for your action to be a candidate regarding these folder-based conditions, each element of the selection must be valid for all the listed conditions: each element must be located in one of the defined « must match one of » folders, and must not match any of the defined « must not match any of » folders.
If at least one element of the selection does not match all the defined conditions, then your action will not be displayed.
When targeting the selection context menu, your folder-based conditions will be checked against the dirname of each currently selected items. When targeting the location context menu or the toolbar, your folder-based conditions will be checked against the current location.
Defining a new folder-based condition involves two steps.
-
Define the new condition filter.
-
Press Insert or click on button to insert a new condition filter
-
Edit the newly inserted condition filter to the folder you want match.
The « * » and « ? » characters are accepted as wildcards at any level of the defined folder filter.
-
Or click on to select a folder on the file system.
-
-
Indicates whether this a « must match one of » or a « must not match any of » condition.
Click on the Must match one of or Must not match any of radio button in the same row to set the corresponding condition.
Removing a defined folder-based condition is as simple as selecting it, and pressing Del (or clicking on button).
By default, the folder-based condition is just one « must match one of / » condition. As / is always the top of an Unix-like file system, then all selected items always match this condition.
If you target a Windows™ system, then this default value may not be what you actually want.
3.1.4. Scheme-base-conditions
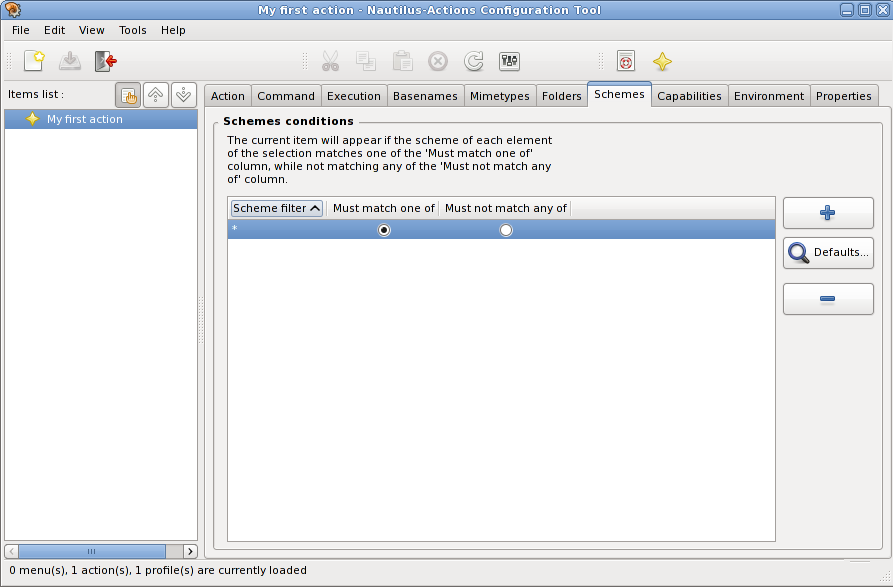
You may decide that your action will appear depending on the schemes of the URIs of the items currently selected in the file-manager: you may define that each item of the selection must have some scheme; and you may simultaneously decide that none of the selected item(s) may have some other scheme.
Click on the Schemes tab to show the page which will permit you to configure your scheme-based conditions.
In fact, scheme-based conditions are built as a list of « must match one of » and « must not match any of » patterns. In order for your action to be a candidate regarding these scheme-based conditions, each element of the selection must be valid for all the listed conditions: the scheme of each element must match at least one of the defined « must match one of » patterns, and must not match any of the defined « must not match any of » patterns.
If at least one element of the selection does not match all the defined conditions, then your action will not be displayed.
When targeting the selection context menu, your scheme-based conditions will be checked against the currently selected items. When targeting the location context menu or the toolbar, your scheme-based conditions will be checked against the scheme of the current location.
Defining a new scheme-based condition involves two steps.
-
Define the new condition filter.
-
Press Insert or click on button to insert a new condition filter
-
Edit the newly inserted condition filter to the scheme you want match.
Scheme-based conditions only accept « * » wildcard, which stands for « any scheme ».
-
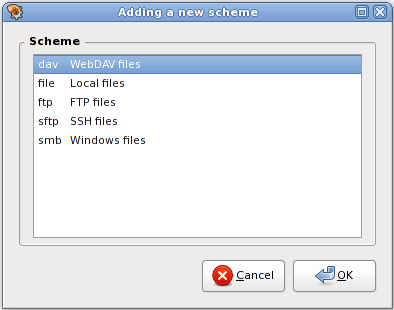
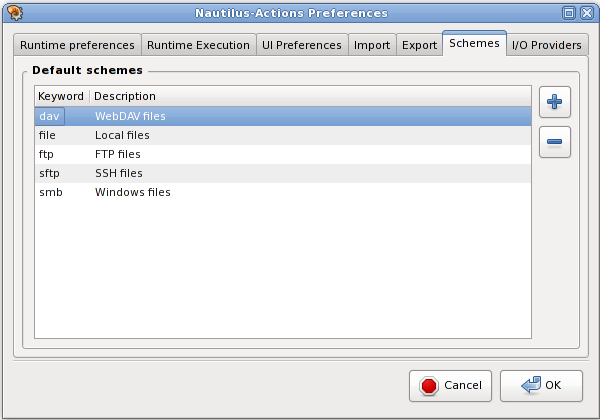
Or click on to select a scheme among those predefined in .
A new scheme may only be selected here if it is not already defined as a scheme filter.
To select a new scheme, click , or double-click on the desired row.
-
-
Indicates whether this a « must match one of » or a « must not match any of » condition.
Click on the Must match one of or Must not match any of radio button in the same row to set the corresponding condition.
Removing a defined scheme-based condition is as simple as selecting it, and pressing Del (or clicking on button).
By default, the scheme-based condition is just one « must match one of * » condition, which means that schemes are not relevant for this action.
3.1.5. Capability-based conditions
Capabilities are some properties that a file may exhibit to the user.
But except for the Local capability, all others depend on the user who executes the command.
You may so decide that your action will appear, or not, depending on the capabilities of the selected item(s) vs. the current user.
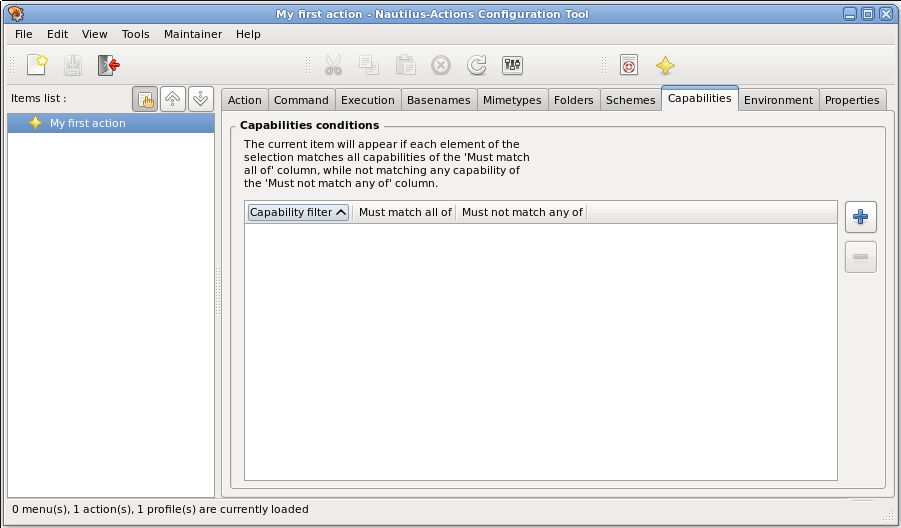
Click on the Capabilities tab to show the page which will permit you to configure your capability-based conditions.
In fact, capability-based conditions are built as a list of « must match all of » and « must not match any of » patterns. In order for your action to be a candidate regarding these capability-based conditions, each element of the selection must be valid for all the listed conditions: the capability of each element must match each of the defined « must match all of » capabilities, and must not match any of the defined « must not match any of » ones.
If at least one element of the selection does not match all the defined conditions, then your action will not be displayed.
When targeting the selection context menu, your capability-based conditions will be checked against the currently selected items. When targeting the location context menu or the toolbar, your capability-based conditions will be checked against those of of the current location.
Defining a new capability-based condition involves two steps.
-
Define the new condition filter.
-
Press Insert to insert a new condition filter
-
Edit the newly inserted condition filter to the capability you want match.
-
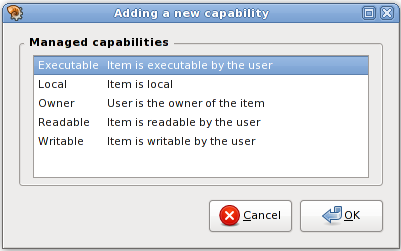
Or click on to open the Adding a new capability dialog box.
A new capability may only be selected here if it is not already defined as a capability filter.
To select a new capability, click , or double-click on the desired row.
-
-
Indicates whether this a « must match all of » or a « must not match any of » condition.
Click on the Must match all of or Must not match any of radio button in the same row to set the corresponding condition.
Removing a defined capability-based condition is as simple as selecting it, and pressing Del (or clicking on button).
By default, the capability-based condition list is empty. This means that capabilities are not relevant for this action.
3.1.6. Selection count condition
You may define that your action will only appear if the current selection in the file manager has some precise count, or some precise relation with a given count.
If your action consists in displaying the differences between two files, you may define here « Count = (equal to) 2 ».
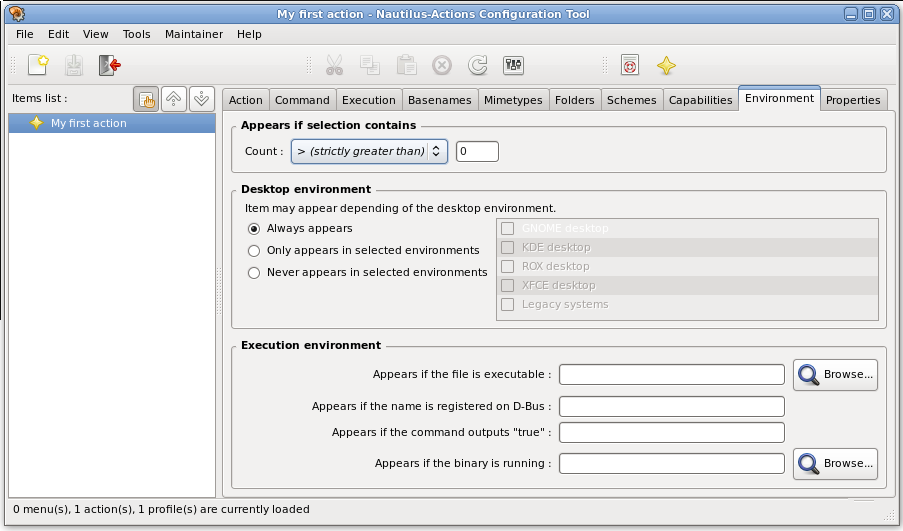
Click on the Environment tab to show the page which will permit you to configure your environment-based conditions.
The selection count condition is defined in the Appears if selection contains frame.
When targeting the selection context menu, the count condition defined here will be checked against the count of currently selected items. When targeting the location context menu or the toolbar, the count condition will be checked against zero because there is no selected item in this case.
To define a selection count condition:
-
Select in the Count drop-down list the operator you want apply to the selection count:
< (strictly less than) = (equal to) > (strictly greater than) -
Enter the reference count you wish.
The selection count defaults to « Count > (strictly greater than) 0 », which means that the action will be a candidate to be displayed as soon as at least one item is selected in the file manager.
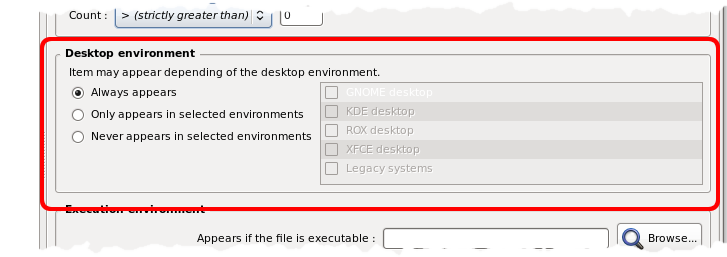
3.1.7. Desktop selection
You may define that your action:
- will always appear,
- or will only appear in some given desktop environments,
- or will not appear in some given desktop environments.
Only one choice between these three items is possible.
Click on the Environment tab to show the page which will permit you to configure your environment-based conditions.
The desktop selection is defined in the Desktop environment frame.
To define the desktop environment condition:
-
First select the type of filter:
should your action always appear, regardless of the desktop environment ? should your action only appear in some desktop environment(s) ? should your action never appear in some desktop environment(s) ? -
If your action should not always appear, then select the relevant desktop environment(s) in the listbox in the right side.
The targeted desktop environment condition defaults to « Always appear », which means that the action will be a candidate to be displayed regardless of the current desktop environment.
3.1.8. Executable found condition
You may define that your action will only appear if some prerequisite package is installed on your system. This is checked here by specifying that a specific file, known or at least supposed to be provided by the package, must be present on the file system, and executable.
Click on the Environment tab to show the page which will permit you to configure your environment-based conditions.
The executable found condition is defined in the Execution environment frame.
To define the relevant file, enter its full filename in the Appears if the file is executable entry box, or click on to select a file on the file system.
Leave the field empty if this condition is not relevant for your action.
You may embed some parameters in the searched filename. These parameters will be dynamically substituted at runtime with values which will depend on currently selected item(s).
3.1.9. D-Bus registration condition
You may define that your action will only appear if some given name is registered on the D-Bus system at runtime.
Click on the Environment tab to show the page which will permit you to configure your environment-based conditions, and focus on Execution environment frame.
To define the relevant name, enter it in the Appears if the name is registered on D-Bus entry box.
Leave the field empty if this condition is not relevant for your action.
You may embed some parameters in the searched name. These parameters will be dynamically substituted at runtime with values which will depend on currently selected item(s).
3.1.10. Customized condition
You may define that your action will only appear if some given command outputs a true string on its standard output.
Click on the Environment tab to show the page which will permit you to configure your environment-based conditions, and focus on Execution environment frame.
This lets you define your own customized condition filter, by writing a small script which outputs, or not, the true string on stdout when it is ran.
To define the command, enter it in the Appears if the command outputs "true" entry box.
Leave the field empty if this condition is not relevant for your action.
You may embed some parameters in the executed filename or its options. These parameters will be dynamically substituted at runtime with values which will depend on currently selected item(s).
3.1.11. Running process condition
You may define that your action will only appear if some given binary is currently running.
Click on the Environment tab to show the page which will permit you to configure your environment-based conditions, and focus on Execution environment frame.
To define the binary, enter its name in the Appears if the binary is running entry box, or click on to select a file on the file system.
Even if you enter here the full filename of a binary, only its basename will be searched for in the processes list at runtime.
Leave the field empty if this condition is not relevant for your action.
You may embed some parameters in the searched name. These parameters will be dynamically substituted at runtime with values which will depend on currently selected item(s).
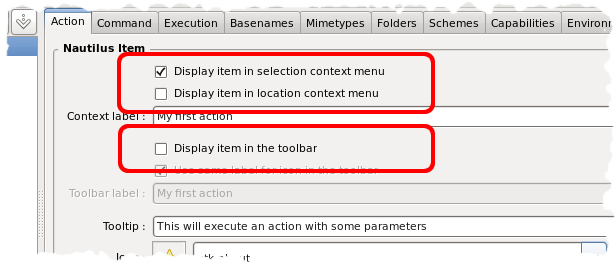
3.2. Locating the action
Caja™ file manager may display your action in different places, depending on what you will request here, and if some item is currently selected (or not).
Click on the Action tab to show the page which will permit you to configure the locations your action targets.
- 3.2.1. Targeting the selection context menu
- 3.2.2. Targeting the location context menu
- 3.2.3. Targeting the toolbar
- 3.2.4. Notes
3.2.1. Targeting the selection context menu
When Display item in selection context menu is checked, then your action will be a candidate to be displayed in Caja™' context menu as soon as at least one item is selected in the file manager. Your action will so deal with currently selected item(s).In order to be actually displayed, all the conditions defined in your candidate action must be met by each item currently selected in the Caja™ file manager.
When an action targets the selection context menu, and is actually displayed in Caja™' context menu, then it is also displayed in Caja™' menu.
This target is checked by default.
3.2.2. Targeting the location context menu
When Display item in location context menu checkbox is activated, then your action will be a candidate to be displayed in Caja™' context menu when the file manager selection is empty. Your action will so deal with currently displayed location. In order to be actually displayed, all the conditions defined in your candidate action must be met by the location currently displayed in the Caja™ file manager.
When an action targets the location context menu, and is actually displayed in Caja™' context menu, then it is also displayed in Caja™' menu.
3.2.3. Targeting the toolbar
When Display item in the toolbar checkbox is activated, then your action will be a candidate to be displayed in Caja™' toolbar.
Actions displayed in the toolbar only deal with the location which is currently displayed in the file-manager, not with the items which may be currently selected (or not). In order to be displayed, all the conditions defined in your candidate action must so be met by the current location.
3.2.4. Notes
Whether it is the selection context menu or the location context menu, and both in Caja™' context menus and in or menus, it will be displayed as
- the Context label as a label,
- the Icon,
- these two properties being associated with the Tooltip.
Depending of the exact configuration of your desktop environment, the icon may or may not be displayed in front of the label in the menu.
You may embed some parameters in the label, the icon name or the tooltip. These parameters will be dynamically substituted at runtime with values which will depend on currently selected item(s).
It will be displayed as
- the Toolbar label as a label,
- the Icon,
- these two properties being associated with the Tooltip.
Depending of the exact configuration of your desktop environment, the toolbar label may or may not be displayed in front of the icon in the toolbar.
The toolbar label defaults to the same label as those used in menus. By unchecking the Use same label for icon in the toolbar checkbox you can define a label specific to the toolbar, which is usually shorter that those defined for the menus.
You may embed some parameters in the toolbar label, the icon name or the tooltip. These parameters will be dynamically substituted at runtime with values which will depend on currently selected item(s).
An action may target the selection context menu, the location context menu and the toolbar, or one or more of these.
If no target is defined, i.e. if the three checkboxes are unchecked, then your action will never be displayed.
3.3. What action should be executed ?
You most probably want that your action eventually ends up in executing something. And, as a matter of fact, having something to execute is one of the few conditions which are required for an action to be considered as valid.
As we have already seen, the command to be executed is configured in the Command page.
This command may take arguments, which themselves may embed parameters. These parameters will be expanded at runtime, with values which will depend on currently selected item(s).
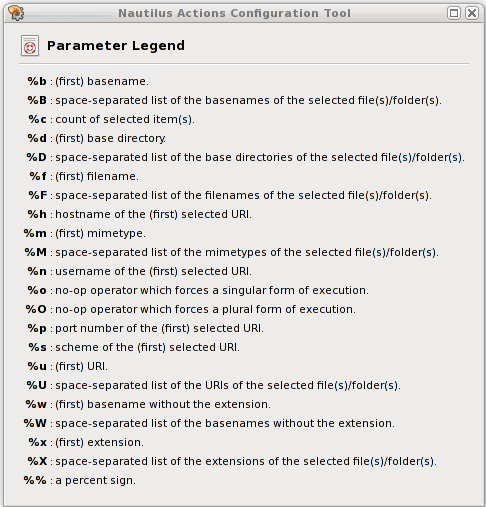
3.3.1. Available parameters
In the Command page, click on Legend button to see the list of available parameters.
The button has a toggling action: click once to display the Parameter Legend dialog box; click a second time to hide it.
The word « first » may be misleading as it only refers to the list of selected items internally provided by the file manager to the Caja-Actions™ plugin.
In particular, it has nothing to do with the visual selection you may have done in the file manager window. And, in fact, which is the « first » selected item in a multiple selection is absolutely undefined and rather unpredictable.
3.3.2. Where the action should it be executed ?
Your action may be executed in a particular working directory.
You may specify it in the Command tab, in the Working directory entry box, or by clicking on to select a folder on the filesystem.
The working directory defaults to %d, which runs the command in the base directory of the (first) selected item.
In the particular case of the %d parameter, the « first » selected item is not very important because it is very likely that all selected items are located in the same base directory.
3.3.3. How should the action be executed ?
Apart from configuring the conditions, the selection must be met in order your action be displayed in file manager menus, Caja-Actions™ allows you to configure how exactly your command will be executed.
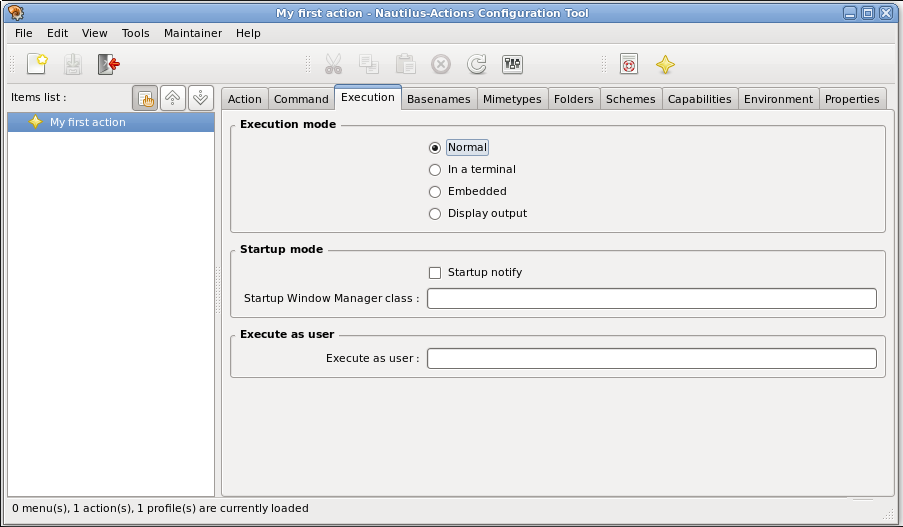
Click on the Execution tab to show the page which configures the execution of your command.
- 3.3.3.1. Execution mode
- 3.3.3.2. Startup notification
- 3.3.3.3. Window class
- 3.3.3.4. Owner of the execution
- 3.3.3.5. Multiple executions
3.3.3.1. Execution mode
The execution mode of your command may be chosen between following values:
- Normal
-
Starts the command as a standard graphical user interface.
- Terminal
-
Starts the preferred terminal of the desktop environment, and runs the command in it.
- Embedded
-
Makes use of a special feature of the file manager which may allow a terminal to be ran in it.
As Caja™ does not have this feature, this option is strictly equivalent to Terminal option.
- Display output
-
Starts the preferred terminal of the desktop environment, and runs the command in it. At end, standard streams (stdout, stderr) are collected and displayed.
The execution mode of a command defaults to Normal. That is, the command is executed without any particular pre- or post-work.
3.3.3.2. Startup notification
If the execution mode of the command is Normal, and if you know that the application will send a remove message with the DESKTOP_STARTUP_ID environment variable set, then check the Startup notify checkbox.
See the http://www.freedesktop.org/Standards/startup-notification-spec for more details.
3.3.3.3. Window class
If the execution mode of the command is Normal, and if you know that the application will map at least one window with a given class name, then enter that name into the Startup Window Manager class entry box.
See the http://www.freedesktop.org/Standards/startup-notification-spec for more details.
3.3.3.4. Owner of the execution
Enter in the Execute as user entry box the username or the UID of the user your command will be run as.
If you do not enter anything in this field, then the command will be executed as the current user.
3.3.3.5. Multiple executions
You may want your command to be executed once, providing it the list of selected items as argument.
Or you may prefer your command to be repeated for each selected item, providing a different item as argument for each execution.
Actually, Caja-Actions™ automatically handles these two behaviors, depending of the form and the order of the parameters in the command arguments.
Though some parameters are not depending on the count of the selection (e.g. « %c », the selection count itself), most have two declensions:
- a « singular » one, e.g. « %b », the basename of the selected item;
- a « plural » one, e.g. « %B », the space-separated list of the basenames of selected items.
When the selection is empty or contains only one element, and from this topic point of view, these two forms are exactly equivalent.
When the selection contains more than one item:
- if the first relevant parameter is of a singular form, then Caja-Actions™ will consider that the command is only able to deal with one item at a time, and thus that it has to be ran one time for each selected item;
- contrarily, if the first relevant parameter found is of the plural form, then Caja-Actions™ will consider that the command is able to deal with a list of items, and thus the command will be executed only once;
- if all found parameters are irrelevant, then Caja-Actions™ defaults to consider that the command should be executed only once.
| Parameter | Description | Repetition | ||
|---|---|---|---|---|
| %b | (first) basename | singular | ||
| %B | space-separated list of basenames | plural | ||
| %c | count of selected items | irrelevant | ||
| %d | (first) base directory | singular | ||
| %D | space-separated list of base directory of each selected items | plural | ||
| %f | (first) filename | singular | ||
| %F | space-separated list of selected filenames | plural | ||
| %h | hostname of the (first) URI | irrelevant | ||
| %m | mimetype of the (first) selected item | singular | ||
| %M | space-separated list of the mimetypes of the selected items | plural | ||
| %n | username of the (first) URI | irrelevant | ||
| %o | no-op operator which forces a singular form of execution | singular | ||
| %O | no-op operator which forces a plural form of execution | plural | ||
| %p | port number of the (first) URI | irrelevant | ||
| %s | scheme of the (first) URI | irrelevant | ||
| %u | (first) URI | singular | ||
| %U | space-separated list of selected URIs | plural | ||
| %w | (first) basename without the extension | singular | ||
| %W | space-separated list of basenames without their extension | plural | ||
| %x | (first) extension | singular | ||
| %X | space-separated list of extensions | plural | ||
| %% | the « % » character | irrelevant | ||
Say the current folder is /data, and the current selection contains the three files pierre, paul and jacques.
then the following commands will be successively run:
| echo pierre |
| echo paul |
| echo jacques |
This is because %b marks a singular parameter. The command is then run once for each of the selected items.
then the following command will be run:
| echo pierre paul jacques |
This is because %B marks a plural parameter. The command is then run only once, with the list of selected items as arguments.
then the following commands will be successively run:
| echo pierre pierre paul jacques |
| echo paul pierre paul jacques |
| echo jacques pierre paul jacques |
This is because the first relevant parameter is %b, and so the command is run once for each selected item, replacing at each occurrence the %b parameter with the corresponding item. The second parameter is computed and added as arguments to the executed command.
then the following commands will be run:
| echo pierre paul jacques pierre |
This is because the first relevant parameter here is %B. The command is then run only once, replacing %B with the space-separated list of basenames. As the command is only run once, the %b is substituted only once with the (first) basename.
3.4. Using profiles to extend your action
There are some situations where you will want a given action behave slightly differently depending on the currently selected items or the current runtime environment.
Say you have an action which opens a terminal in the current location.
You have configured it to open your preferred terminal in the location your file manager currently points to.
But what if you want to select a directory in your file manager, and directly open your terminal in this directory ? If you keep based on the current file manager location, your terminal will open in the parent of the targeted directory.
One solution is to define a new profile to your action, configuring this profile to open the terminal in the targeted directory.
At runtime, Caja-Actions™ will successively examine each profile attached to your action. If the first profile targets a file while you have selected a directory, then Caja-Actions™ will just try with your second profile.
To create a new profile, first select the action in the items list, then choose .
A new profile is created in your action.
You can now define the conditions which must be met in order this profile be selected, and the command which will be executed.
3.4.1. Ordering the profiles inside an action
At runtime, Caja-Actions™ will begin with examining the conditions set on your action.
If these conditions (the action-conditions) are met, then Caja-Actions™ will examine in order each profile.
If the conditions defined in a profile are met, then this profile will be validated, and the review of other profiles will stop.
If no profile is found valid at runtime, then the action will be itself considered invalid, and will not be displayed in the file manager context menu.
Profiles of an action are ordered, and they are examined in that order at runtime. The first profile whose conditions are met will be validated, and made selectable in the Caja™ context menu.
So, ordering of the profiles may be important for your action: the first valid profile found is the only one selected.
You may order your profiles inside an action in two ways.
- Cut the profile to be moved, select the profile before which you want your cut profile to be inserted, and paste it.
- Click on the profile to be moved, and drag it to its right place.
3.5. Organizing actions in menus
As your list of actions will grow, you most probably will want to organize them into menus, submenus, and so on.
In order to create a new menu, choose .
A menu may be created anywhere in the list of your actions, but inside of an action (i.e. not between two profiles of an action).
As an action, the exact place where a new menu will be inserted depends on the current sort order:
- Manual order:
-
The new menu is inserted just before the current action or menu.
This place will not change when you later modify the label of the menu.
- Ascending (resp. descending) alphabetical order:
-
The new menu is inserted at the correct place, regarding the default « New Caja menu » label.
This place will be automatically changed, each time you modify the label of the menu.
As an action, too, a menu requires a label, and may have an icon and a tooltip. Also, you may define some conditions in order your menu be candidate to be displayed in Caja™ context menu. If the defined conditions are not met at runtime, then your whole menu, including its submenus, its actions and so on, will not be displayed.
3.6. Sorting the items list
Your actions and menus will be displayed in file manager context menus in the same order that they are listed in the Items list, on the left pane of the main Caja-Actions Configuration Tool window.
You may decide to:
- sort your actions and menus in ascending or descending alphabetical order of their label,
- or do not sort, and manually organize your actions and menus in your own order.
3.6.1. Alphabetically sorting your actions and menus
In these modes, actions and menus are sorted depending of their label, inside of their parent.
You may sort your actions by:
- Click on (resp. ) button to sort your actions in ascending (resp. descending) order.
- Or edit the corresponding preference.
3.6.2. Manually organizing your actions and menus
When items are manually sorted in the list, new items are usually inserted just at the current position.
There is nonetheless the case where an action is selected, and not expanded (or has currently only one profile). Inserting a new profile will not insert it before the action, but inside of the action.
To choose this mode:
- Click on button.
- Or edit the corresponding preference.
3.7. Editing
With Caja-Actions Configuration Tool, you may safely cut, copy, paste to and from the clipboard.
- 3.7.1. Cut/Delete
- 3.7.2. Multiple selection
3.7.1. Cut/Delete
Deletion applies to current selection.
Be warned that selecting and deleting all profiles of an action leaves it without any profile, so in an invalid state. The name of the action will be written in red (because it is invalid) italic (because it has been modified) characters.
3.7.2. Multiple selection
Multiple selection is possible in Caja-Actions Configuration Tool. You can extend the current selection by pressing Ctrl or Shift while selecting an item to add to the selection.
Caja-Actions Configuration Tool only accepts homogeneous multiple selections. That is, you may select one or more profiles, or one or more actions or menus. A multiple selection containing both profiles and actions or menus is not allowed. This is because Caja-Actions Configuration Tool would not know where to paste such a selection.
Note that selecting any row means also selecting children of this row. These children are said « implicitely selected »: they will be part of next edition operations, but are not considered when verifying if selection is homogeneous. Also, they cannot be explicitely selected (nor unselected).
3.8. Saving your modifications
To save your modifications, choose .
All your pending modifications will be saved. New items will be created by the first available writable I/O provider.
Caja-Actions™ also has an Auto-save feature which is configurable in dialog box.
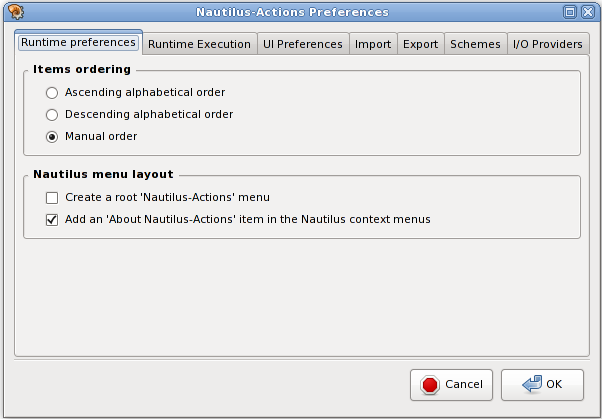
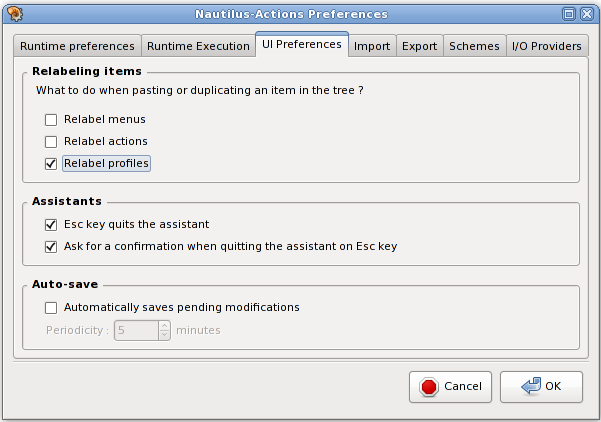
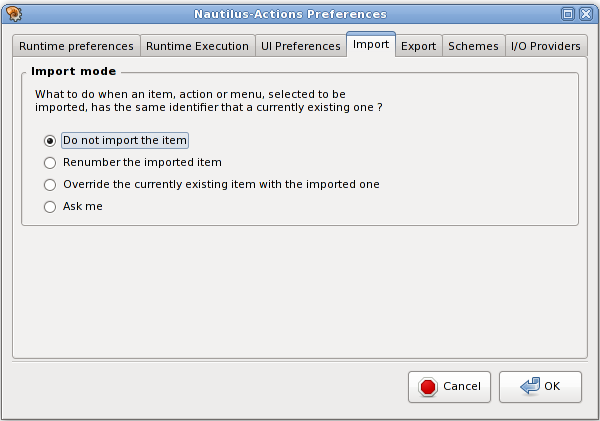
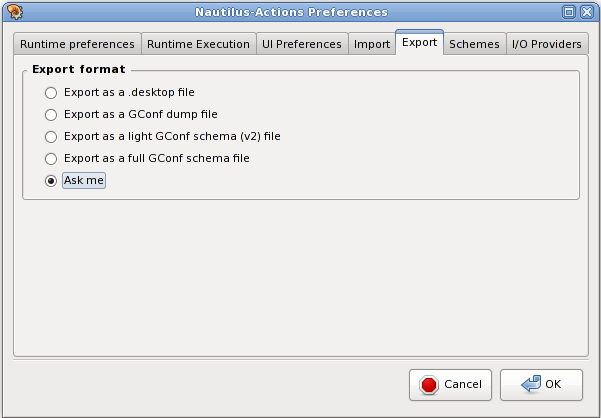
3.11. Setting your own preferences
Choose to access to the configuration of your preferences.
- 3.11.1. Runtime preferences
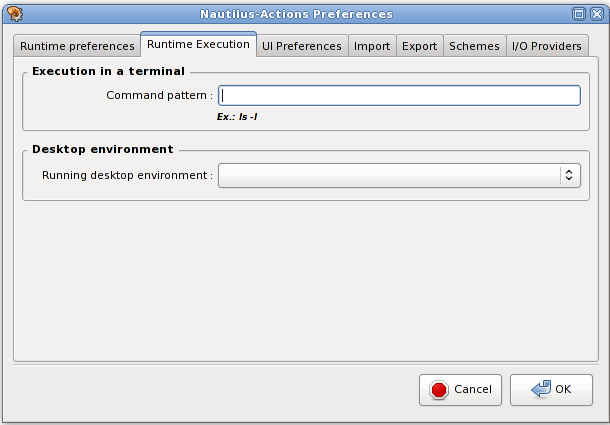
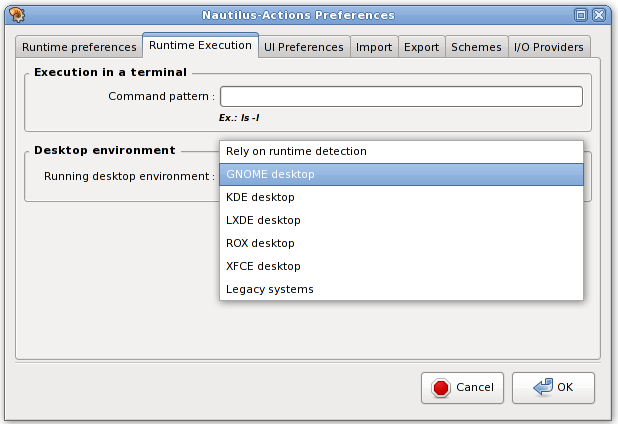
- 3.11.2. Runtime execution preferences
- 3.11.3. User interface preferences
- 3.11.4. Import preferences
- 3.11.5. Export preferences
- 3.11.6. Schemes preferences
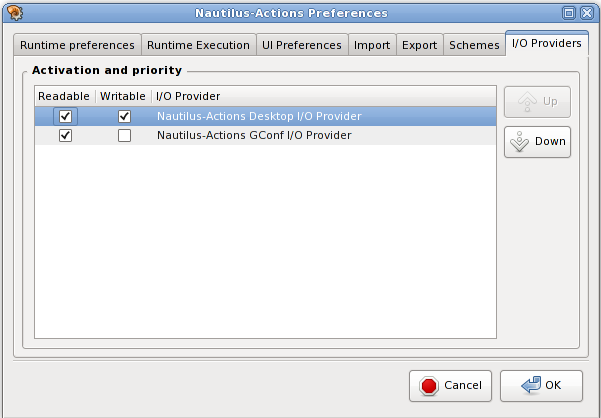
- 3.11.7. I/O providers preferences
4. Miscellaneous informations
The new action is also displayed in red color in the items list. Red color is used as an indicator that the item is invalid, that is that the item cannot be candidate to be displayed in a Caja™ context menu because some of its informations are missing or erroneous. Here, and though this newly inserted action has some suitable defaults, it lacks a command to be executed to be considered valid by Caja-Actions Configuration Tool
5. Known Bugs and Limitations
- 5.1. Known bugs
- 5.2. Known limitations
5.1. Known bugs
Known bugs are available on Bugzilla summary page.
If you find some new bug in Caja-Actions™, you are welcome to open it by pointing your favorite browser to Bugzilla web site.
When you're browsing the folder you want to export to in the Caja-Actions Configuration Tool's export assistant you can't select it as the directory to export to. Instead you have to go to the directory a level up and select the directory you want to export to there.
5.2. Known limitations
As of version 3.0, execution mode may be configured in Caja-Actions Configuration Tool but is not yet honored by Caja™ plugin.
This concern working directory, execution mode, startup notification and execution's owner parameters.
As of version 3.0, suggested shortcut, as described in DES-EMA specification cannot be configured in Caja-Actions Configuration Tool, and is not honored by Caja™ plugin.
As of version 3.0, menu separators cannot be configured in Caja-Actions Configuration Tool, and are not honored by Caja™ plugin.
One has to note that, for now, Caja™ file manager does not allow its plugins to define separators in the context menu.
6. About Caja-Actions Configuration Tool
The first version of Caja-Actions™ was initially written by Frederic Ruaudel (<grumz@grumz.net>) and Rodrigo Moya (<rodrigo@mate-db.org>). It has been thoroughly improved and is currently maintained by Pierre Wieser (<pwieser@trychlos.org>).
Artwork is due to courtesy of Ulisse Perusin (<uli.peru@gmail.com>) and DragonArtz (http://www.dragonartz.net).
To find more information about Caja-Actions™, please visit the http://www.caja-actions.org/ Caja-Actions™ website.
To report a bug or make a suggestion regarding Caja-Actions™, the Caja-Actions Configuration Tool or this manual, follow the directions in the MATE Feedback Page, or you may prefer, at your convenience, directly open a bug or a request for enhancement in Bugzilla website.
A. GNU Free Documentation License
Version 1.3, 3 November 2008
Copyright © 2000, 2001, 2002, 2007, 2008 Free Software Foundation, Inc.
Everyone is permitted to copy and distribute verbatim copies of this license document, but changing it is not allowed.
The purpose of this License is to make a manual, textbook, or other functional and useful document “free” in the sense of freedom: to assure everyone the effective freedom to copy and redistribute it, with or without modifying it, either commercially or noncommercially. Secondarily, this License preserves for the author and publisher a way to get credit for their work, while not being considered responsible for modifications made by others.
This License is a kind of “copyleft”, which means that derivative works of the document must themselves be free in the same sense. It complements the GNU General Public License, which is a copyleft license designed for free software.
We have designed this License in order to use it for manuals for free software, because free software needs free documentation: a free program should come with manuals providing the same freedoms that the software does. But this License is not limited to software manuals; it can be used for any textual work, regardless of subject matter or whether it is published as a printed book. We recommend this License principally for works whose purpose is instruction or reference.
This License applies to any manual or other work, in any medium, that contains a notice placed by the copyright holder saying it can be distributed under the terms of this License. Such a notice grants a world-wide, royalty-free license, unlimited in duration, to use that work under the conditions stated herein. The “Document”, below, refers to any such manual or work. Any member of the public is a licensee, and is addressed as “you”. You accept the license if you copy, modify or distribute the work in a way requiring permission under copyright law.
A “Modified Version” of the Document means any work containing the Document or a portion of it, either copied verbatim, or with modifications and/or translated into another language.
A “Secondary Section” is a named appendix or a front-matter section of the Document that deals exclusively with the relationship of the publishers or authors of the Document to the Document’s overall subject (or to related matters) and contains nothing that could fall directly within that overall subject. (Thus, if the Document is in part a textbook of mathematics, a Secondary Section may not explain any mathematics.) The relationship could be a matter of historical connection with the subject or with related matters, or of legal, commercial, philosophical, ethical or political position regarding them.
The “Invariant Sections” are certain Secondary Sections whose titles are designated, as being those of Invariant Sections, in the notice that says that the Document is released under this License. If a section does not fit the above definition of Secondary then it is not allowed to be designated as Invariant. The Document may contain zero Invariant Sections. If the Document does not identify any Invariant Sections then there are none.
The “Cover Texts” are certain short passages of text that are listed, as Front-Cover Texts or Back-Cover Texts, in the notice that says that the Document is released under this License. A Front-Cover Text may be at most 5 words, and a Back-Cover Text may be at most 25 words.
A “Transparent” copy of the Document means a machine-readable copy, represented in a format whose specification is available to the general public, that is suitable for revising the document straightforwardly with generic text editors or (for images composed of pixels) generic paint programs or (for drawings) some widely available drawing editor, and that is suitable for input to text formatters or for automatic translation to a variety of formats suitable for input to text formatters. A copy made in an otherwise Transparent file format whose markup, or absence of markup, has been arranged to thwart or discourage subsequent modification by readers is not Transparent. An image format is not Transparent if used for any substantial amount of text. A copy that is not “Transparent” is called “Opaque”.
Examples of suitable formats for Transparent copies include plain ASCII without markup, Texinfo input format, LaTeX input format, SGML or XML using a publicly available DTD, and standard-conforming simple HTML, PostScript or PDF designed for human modification. Examples of transparent image formats include PNG, XCF and JPG. Opaque formats include proprietary formats that can be read and edited only by proprietary word processors, SGML or XML for which the DTD and/or processing tools are not generally available, and the machine-generated HTML, PostScript or PDF produced by some word processors for output purposes only.
The “Title Page” means, for a printed book, the title page itself, plus such following pages as are needed to hold, legibly, the material this License requires to appear in the title page. For works in formats which do not have any title page as such, “Title Page” means the text near the most prominent appearance of the work’s title, preceding the beginning of the body of the text.
The “publisher” means any person or entity that distributes copies of the Document to the public.
A section “Entitled XYZ” means a named subunit of the Document whose title either is precisely XYZ or contains XYZ in parentheses following text that translates XYZ in another language. (Here XYZ stands for a specific section name mentioned below, such as “Acknowledgements”, “Dedications”, “Endorsements”, or “History”.) To “Preserve the Title” of such a section when you modify the Document means that it remains a section “Entitled XYZ” according to this definition.
The Document may include Warranty Disclaimers next to the notice which states that this License applies to the Document. These Warranty Disclaimers are considered to be included by reference in this License, but only as regards disclaiming warranties: any other implication that these Warranty Disclaimers may have is void and has no effect on the meaning of this License.
You may copy and distribute the Document in any medium, either commercially or noncommercially, provided that this License, the copyright notices, and the license notice saying this License applies to the Document are reproduced in all copies, and that you add no other conditions whatsoever to those of this License. You may not use technical measures to obstruct or control the reading or further copying of the copies you make or distribute. However, you may accept compensation in exchange for copies. If you distribute a large enough number of copies you must also follow the conditions in section 3.
You may also lend copies, under the same conditions stated above, and you may publicly display copies.
If you publish printed copies (or copies in media that commonly have printed covers) of the Document, numbering more than 100, and the Document’s license notice requires Cover Texts, you must enclose the copies in covers that carry, clearly and legibly, all these Cover Texts: Front-Cover Texts on the front cover, and Back-Cover Texts on the back cover. Both covers must also clearly and legibly identify you as the publisher of these copies. The front cover must present the full title with all words of the title equally prominent and visible. You may add other material on the covers in addition. Copying with changes limited to the covers, as long as they preserve the title of the Document and satisfy these conditions, can be treated as verbatim copying in other respects.
If the required texts for either cover are too voluminous to fit legibly, you should put the first ones listed (as many as fit reasonably) on the actual cover, and continue the rest onto adjacent pages.
If you publish or distribute Opaque copies of the Document numbering more than 100, you must either include a machine-readable Transparent copy along with each Opaque copy, or state in or with each Opaque copy a computer-network location from which the general network-using public has access to download using public-standard network protocols a complete Transparent copy of the Document, free of added material. If you use the latter option, you must take reasonably prudent steps, when you begin distribution of Opaque copies in quantity, to ensure that this Transparent copy will remain thus accessible at the stated location until at least one year after the last time you distribute an Opaque copy (directly or through your agents or retailers) of that edition to the public.
It is requested, but not required, that you contact the authors of the Document well before redistributing any large number of copies, to give them a chance to provide you with an updated version of the Document.
You may copy and distribute a Modified Version of the Document under the conditions of sections 2 and 3 above, provided that you release the Modified Version under precisely this License, with the Modified Version filling the role of the Document, thus licensing distribution and modification of the Modified Version to whoever possesses a copy of it. In addition, you must do these things in the Modified Version:
-
Use in the Title Page (and on the covers, if any) a title distinct from that of the Document, and from those of previous versions (which should, if there were any, be listed in the History section of the Document). You may use the same title as a previous version if the original publisher of that version gives permission.
-
List on the Title Page, as authors, one or more persons or entities responsible for authorship of the modifications in the Modified Version, together with at least five of the principal authors of the Document (all of its principal authors, if it has fewer than five), unless they release you from this requirement.
-
State on the Title page the name of the publisher of the Modified Version, as the publisher.
-
Preserve all the copyright notices of the Document.
-
Add an appropriate copyright notice for your modifications adjacent to the other copyright notices.
-
Include, immediately after the copyright notices, a license notice giving the public permission to use the Modified Version under the terms of this License, in the form shown in the Addendum below.
-
Preserve in that license notice the full lists of Invariant Sections and required Cover Texts given in the Document’s license notice.
-
Include an unaltered copy of this License.
-
Preserve the section Entitled “History”, Preserve its Title, and add to it an item stating at least the title, year, new authors, and publisher of the Modified Version as given on the Title Page. If there is no section Entitled “History” in the Document, create one stating the title, year, authors, and publisher of the Document as given on its Title Page, then add an item describing the Modified Version as stated in the previous sentence.
-
Preserve the network location, if any, given in the Document for public access to a Transparent copy of the Document, and likewise the network locations given in the Document for previous versions it was based on. These may be placed in the “History” section. You may omit a network location for a work that was published at least four years before the Document itself, or if the original publisher of the version it refers to gives permission.
-
For any section Entitled “Acknowledgements” or “Dedications”, Preserve the Title of the section, and preserve in the section all the substance and tone of each of the contributor acknowledgements and/or dedications given therein.
-
Preserve all the Invariant Sections of the Document, unaltered in their text and in their titles. Section numbers or the equivalent are not considered part of the section titles.
-
Delete any section Entitled “Endorsements”. Such a section may not be included in the Modified Version.
-
Do not retitle any existing section to be Entitled “Endorsements” or to conflict in title with any Invariant Section.
-
Preserve any Warranty Disclaimers.
If the Modified Version includes new front-matter sections or appendices that qualify as Secondary Sections and contain no material copied from the Document, you may at your option designate some or all of these sections as invariant. To do this, add their titles to the list of Invariant Sections in the Modified Version’s license notice. These titles must be distinct from any other section titles.
You may add a section Entitled “Endorsements”, provided it contains nothing but endorsements of your Modified Version by various parties — for example, statements of peer review or that the text has been approved by an organization as the authoritative definition of a standard.
You may add a passage of up to five words as a Front-Cover Text, and a passage of up to 25 words as a Back-Cover Text, to the end of the list of Cover Texts in the Modified Version. Only one passage of Front-Cover Text and one of Back-Cover Text may be added by (or through arrangements made by) any one entity. If the Document already includes a cover text for the same cover, previously added by you or by arrangement made by the same entity you are acting on behalf of, you may not add another; but you may replace the old one, on explicit permission from the previous publisher that added the old one.
The author(s) and publisher(s) of the Document do not by this License give permission to use their names for publicity for or to assert or imply endorsement of any Modified Version.
You may combine the Document with other documents released under this License, under the terms defined in section 4 above for modified versions, provided that you include in the combination all of the Invariant Sections of all of the original documents, unmodified, and list them all as Invariant Sections of your combined work in its license notice, and that you preserve all their Warranty Disclaimers.
The combined work need only contain one copy of this License, and multiple identical Invariant Sections may be replaced with a single copy. If there are multiple Invariant Sections with the same name but different contents, make the title of each such section unique by adding at the end of it, in parentheses, the name of the original author or publisher of that section if known, or else a unique number. Make the same adjustment to the section titles in the list of Invariant Sections in the license notice of the combined work.
In the combination, you must combine any sections Entitled “History” in the various original documents, forming one section Entitled “History”; likewise combine any sections Entitled “Acknowledgements”, and any sections Entitled “Dedications”. You must delete all sections Entitled “Endorsements”.
You may make a collection consisting of the Document and other documents released under this License, and replace the individual copies of this License in the various documents with a single copy that is included in the collection, provided that you follow the rules of this License for verbatim copying of each of the documents in all other respects.
You may extract a single document from such a collection, and distribute it individually under this License, provided you insert a copy of this License into the extracted document, and follow this License in all other respects regarding verbatim copying of that document.
A compilation of the Document or its derivatives with other separate and independent documents or works, in or on a volume of a storage or distribution medium, is called an “aggregate” if the copyright resulting from the compilation is not used to limit the legal rights of the compilation’s users beyond what the individual works permit. When the Document is included in an aggregate, this License does not apply to the other works in the aggregate which are not themselves derivative works of the Document.
If the Cover Text requirement of section 3 is applicable to these copies of the Document, then if the Document is less than one half of the entire aggregate, the Document’s Cover Texts may be placed on covers that bracket the Document within the aggregate, or the electronic equivalent of covers if the Document is in electronic form. Otherwise they must appear on printed covers that bracket the whole aggregate.
Translation is considered a kind of modification, so you may distribute translations of the Document under the terms of section 4. Replacing Invariant Sections with translations requires special permission from their copyright holders, but you may include translations of some or all Invariant Sections in addition to the original versions of these Invariant Sections. You may include a translation of this License, and all the license notices in the Document, and any Warranty Disclaimers, provided that you also include the original English version of this License and the original versions of those notices and disclaimers. In case of a disagreement between the translation and the original version of this License or a notice or disclaimer, the original version will prevail.
If a section in the Document is Entitled “Acknowledgements”, “Dedications”, or “History”, the requirement (section 4) to Preserve its Title (section 1) will typically require changing the actual title.
You may not copy, modify, sublicense, or distribute the Document except as expressly provided under this License. Any attempt otherwise to copy, modify, sublicense, or distribute it is void, and will automatically terminate your rights under this License.
However, if you cease all violation of this License, then your license from a particular copyright holder is reinstated (a) provisionally, unless and until the copyright holder explicitly and finally terminates your license, and (b) permanently, if the copyright holder fails to notify you of the violation by some reasonable means prior to 60 days after the cessation.
Moreover, your license from a particular copyright holder is reinstated permanently if the copyright holder notifies you of the violation by some reasonable means, this is the first time you have received notice of violation of this License (for any work) from that copyright holder, and you cure the violation prior to 30 days after your receipt of the notice.
Termination of your rights under this section does not terminate the licenses of parties who have received copies or rights from you under this License. If your rights have been terminated and not permanently reinstated, receipt of a copy of some or all of the same material does not give you any rights to use it.
The Free Software Foundation may publish new, revised versions of the GNU Free Documentation License from time to time. Such new versions will be similar in spirit to the present version, but may differ in detail to address new problems or concerns. See Copyleft.
Each version of the License is given a distinguishing version number. If the Document specifies that a particular numbered version of this License “or any later version” applies to it, you have the option of following the terms and conditions either of that specified version or of any later version that has been published (not as a draft) by the Free Software Foundation. If the Document does not specify a version number of this License, you may choose any version ever published (not as a draft) by the Free Software Foundation. If the Document specifies that a proxy can decide which future versions of this License can be used, that proxy’s public statement of acceptance of a version permanently authorizes you to choose that version for the Document.
“Massive Multiauthor Collaboration Site” (or “MMC Site”) means any World Wide Web server that publishes copyrightable works and also provides prominent facilities for anybody to edit those works. A public wiki that anybody can edit is an example of such a server. A “Massive Multiauthor Collaboration” (or “MMC”) contained in the site means any set of copyrightable works thus published on the MMC site.
“CC-BY-SA” means the Creative Commons Attribution-Share Alike 3.0 license published by Creative Commons Corporation, a not-for-profit corporation with a principal place of business in San Francisco, California, as well as future copyleft versions of that license published by that same organization.
“Incorporate” means to publish or republish a Document, in whole or in part, as part of another Document.
An MMC is “eligible for relicensing” if it is licensed under this License, and if all works that were first published under this License somewhere other than this MMC, and subsequently incorporated in whole or in part into the MMC, (1) had no cover texts or invariant sections, and (2) were thus incorporated prior to November 1, 2008.
The operator of an MMC Site may republish an MMC contained in the site under CC-BY-SA on the same site at any time before August 1, 2009, provided the MMC is eligible for relicensing.
To use this License in a document you have written, include a copy of the License in the document and put the following copyright and license notices just after the title page:
Copyright © YEAR YOUR NAME

Permission is granted to copy, distribute and/or modify this document under the
terms of the GNU Free Documentation License, Version 1.3 or any later version
published by the Free Software Foundation; with no Invariant Sections, no
Front-Cover Texts, and no Back-Cover Texts. A copy of the license is included in
the section entitled “GNU Free Documentation License”.
If you have Invariant Sections, Front-Cover Texts and Back-Cover Texts, replace the “with… Texts.” line with this:
with the Invariant Sections being LIST THEIR TITLES, with the Front-Cover Texts
being LIST, and with the Back-Cover Texts being LIST.
If you have Invariant Sections without Cover Texts, or some other combination of the three, merge those two alternatives to suit the situation.
If your document contains nontrivial examples of program code, we recommend releasing these examples in parallel under your choice of free software license, such as the GNU General Public License, to permit their use in free software.
